Thursday, May 10, 2012

Step By Step with Screen Shots! ;)

To Go back to the First Page CLICK [HERE]
Instructions
STEPS:
1) Unlock bootloader with HTCDev.com (guide here under section "HTC bootloader unlocker"). When you're done, it should look like the below picture:


2) While in Bootloader, switch to "FASTBOOT" mode by highlighting "FASTBOOT" option and pressing the Power button. The menu options should change, and it should now say "FASTBOOT USB" (see this picture).


3) Install custom recovery (previously downloaded from OP) using fastboot
Code:
fastboot flash recovery [name of recovery file]


-OR-


Android Flasher


4) Boot into recovery, flash latest superuser (3.07, with 3.0.3.2 binary

NOTE: If you get an error when flashing this zip file (i.e. signature verification failed), there is an option to "Toggle Signature Verification" under the "Flash zip menu". Do that, and then try flashing again.


5) Reboot device, enable USB Debugging (Settings -> Applications -> Development), and disable "Fast Boot".

6) Connect device to computer ("Charge only" mode), open command prompt, and navigate to location of "adb" from HTCDev unlocking process.

7) Run the command "adb shell".

8) If "$" appears, you do not have root access. Type "su" to access root. "$" should change to a "#".
NOTE: If it doesn't change (though I don't know why it wouldn't), go to Market (signing into Google will be required), and download "Root Checker". Open Root Checker, and you should be prompted to allow root access. If successful, type "su" at the adb prompt again, and you should have root.

9) Using the previously downloaded "flash_image.zip" & "mtd-eng.zip", extract the files contained in the zips. Put the flash_image and mtd-eng.img on the root of your sdcard. Then, input the following commands, as seen in the picture below:

Code:
cat /sdcard/flash_image > /data/flash_image [ENTER]
chmod 755 /data/flash_image [ENTER]
/data/flash_image misc /sdcard/mtd-eng.img [ENTER]


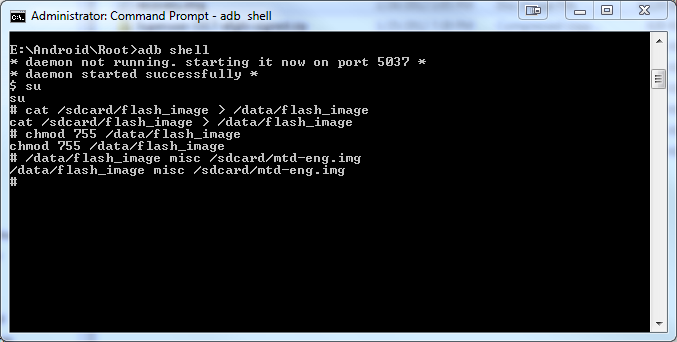
Once the misc partition has been updated (i.e. the last command above has been run, and there are no errors), you can close the adb shell (by typing "exit") and proceed to the next step - downgrade your Bootloader and HBOOT to a non-watermarked version rootable with unrevoked.

10) Using the previously downloaded Froyo PC36IMG.zip from the OP, rename to "PC36IMG.zip", and place on root of SD Card. Reboot into Bootloader, and follow the prompts to update device (Notice in the below picture that the watermark shows as "LOCKED" again).


11) Once the update is complete, you will have HBOOT 2.10 and radio 2.15.00.11.19, which is rootable with unrevoked (Notice that the watermark is now COMPLETELY gone!).


You will need to use unrevoked3, which will install a custom recovery and unlock your NAND with unrevoked forever (Wiki HERE, guide HERE - starting under "SECTION 2: ROOTING PROCEDURE"). TIP: Make sure your device is disconnected when first running the unrevoked3 "reflash_package.exe". When it opens, choose "File", then "Custom Recovery ...". Navigate to the location of your preferred RA recovery.img file, and select. Then, when it's done, you'll be NAND unlocked, and have your preferred custom recovery!

All Done!!

THIS IS A VIDEO GUIDE OF FROM UNLOCKING TO ROOTING EVO 4G!


Tuesday, May 8, 2012

Read first before going to the GUIDE step by step!

This is my guide on how to achieve S-OFF on an unrooted, NAND-locked device running the latest (4.67.651.1){4.67.651.3)(5.07.651.1) Latest OTA HBOOT version (2.18) with Android Version 2.3.5. 

The method involves using HTCDev.com to unlock the Bootloader of the device (which this guide will not cover, as there are procedures on the HTCDev site for that).

This guide will cover what to do after your Bootloader is "unlocked" by that process, in order to roll back your HBOOT to a non-watermarked version that can be rooted with unrevoked.


The rooting process with unrevoked will also not be covered in this thread, as it is well-documented.


Files you'll need
Armon_RA-Recovery - USED IN STEP 3 (there are 3 different versions you can use - I recommend this one):


Recovery click DOWNLOAD don't forget to check the
md5: 219FE492872E2BFAD57C16545BA340CE


Superuser 3.07 - USED IN STEP 4 DOWNLOAD
md5: fc462fa0630379edbe10006b1d19d9b1)


flash_image binary - USED IN STEP 9 DOWNLOAD 
md5: 97B64A4C8CB22E39F79062402D26A126)


Misc/MTD Partition IMG file from Engineering build-IN STEP 9 DOWNLOAD 
md5: 830C28C64A02023CB806306326070F7B)


3.70 Froyo ROM with 2.10 HBOOT
md5: 7056D42812AA5DF03FCC8DDDC2B64E85
USED IN STEP 10
1.Download-PC36IMG.zip |2. Mirror DownLoad(FileFactory) | 3.Mirror (4shared)

Fastboot Files to extract inside C:/android instead trying to install SDK, I had narrow it down just the ones you need. DOWNLOAD

HTC Driver3.0.0.007.exe DOWNLOAD


"IMPORTANT NOTE!" Image files like flash_image and MTD_image have the contents unzip or extract first and movethem outside the folder and place them on the ROOT on the SD. Command will not see files if inside folders or still in zip formats. Read more important notes below before clicking on the "Instructions Below."


Instructions with IMAGES click [HERE!!]


IMPORTANT NOTES:
  • If all you want to do is root and be able to install custom ROMs, then you do NOT NEED THIS GUIDE! HTC's unlocker will allow you to do that by installing a custom recovery.This guide is NOT for beginners. If you don't know WHY you want to be S-OFF, then you probably don't need to be. This is for advanced users, or those who are still under warranty and need to send their phone for repairs after using the HTCDev unlock process.
  • This guide assumes that you've completed the unlocking process from HTCDev.com, which means you've also downloaded fastboot/adb to a local folder on your computer. That will be the same folder from which you will be running the commands listed in this thread.
  • The Superuser file is a flashable zip, which means it must NOT be extracted after downloading! After download is complete, copy to /sdcard as-is, so that it can be flashed in recovery.
  • In order to flash recovery in fastboot, the recovery.img file from the zip file needs to be in the same folder as the fastboot.exe.
  • The flash_image binary and the mtd-eng.img can be placed on the root of the /sdcard prior to starting the S-OFF process.
  • The PC36IMG.zip should NOT be placed on the SD card until the step (10) where it is used. If you have it on the card, it will cause delays in loading fastboot on the device.


  • If the bootloader doesn't recognize the PC36IMG.zip, and you used Windows Explorer to rename the PC36IMG file, make sure you didn't add an extra ".zip" to the end of the file name. Most people hide file extensions, so that can happen without you even realizing it (especially if you see that it's already recognized as a "ZIP" file). If you still have issues after checking that, the only other reason it wouldn't work is a corrupt or faulty SD card. If you can try a different card, see if the PC36IMG file works on it.
  • If you'd prefer to root/NAND unlock using Revolutionary, you can substitute the Froyo ROM file (in Step 10) with a Gingerbread ROM file (any version up to 4.54). The latest version unlockable with Revolutionary can be found HERE!

THIS A VIDEO GUIDE OF THAT WILL HELP FURTHER IN DETAIL.